The 2023 12 Days of Stitchmas Featured Small Businesses

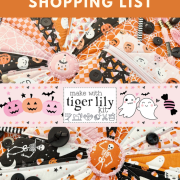
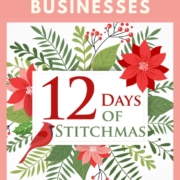
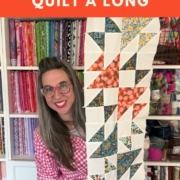
Are you Ready? The 2023 12 Days of Stitchmas is HERE.

This is where I will share two Featured Small Businesses in the stitching, knitting, quilting, and making communities with you in a daily YouTube video. Each day with daily Giveways, as well as a Grand Prize Giveaway.

To Enter in the Grand Prize – you must fill out the word of the day on the Crossword Puzzle – Get it HERE

I have created this Post as a ONE STOP SHOPPING place for you to get the Daily Featured Small Business Details.

Of course, the details are in the YouTube video description as well – but here it’s all in one place. All the business names, link and coupon codes. I hope this is helpful. I know these businesses would greatly appreciate your support whether it’s via purchases or even just following their shop on Instagram…..tell them Tiger Lily sent you!

Day 12

Business Name: Earth and Empress

The Person Behind it All: Carrie

Etsy Shop: https://www.etsy.com/shop/earthandempress

Instagram: https://www.instagram.com/earthandempress/

Coupon Code: STITCHMAS23 for 15% off until 1/14/24


Business Name: FabShabbyRose

The Person Behind it All: Carolyn

Etsy Shop: https://www.etsy.com/shop/FabShabbyRose

Instagram: https://www.instagram.com/mumsky43/


Day 11

Business Name: Norgrove Enterprises

The Person Behind it All: Jon & Julie

Etsy Shop: https://www.etsy.com/shop/norgroveenterprises

Instagram: https://www.instagram.com/shopnorgrove/


Business Name: That Salty Stitch

The Person Behind it All: Jenna

Etsy Shop: https://thatsaltystitchshop.etsy.com

Instagram: https://www.instagram.com/thatsaltystitch/

Coupon Code: SALTY 15% off until 12/18/23

Day 10

Business Name: Scarlet Sky Designs

The Person Behind it All: Shelby

Website: https://scarletskydesigns.com/

Etsy Shop: https://www.etsy.com/shop/ScarletSkyDesignsTX

Instagram: https://www.instagram.com/scarletskydesignstx/


Business Name: Meadow Lark Ct

The Person Behind it All: Jenie

Website: https://www.etsy.com/shop/meadowlarkct

Instagram: https://www.instagram.com/meadowlarkcourt/

Coupon Code: JOLLY23 for 20% until 1/1/24

Day 9

Business Name: PK Yarns

The Person Behind it All: Pamela

Website: https://www.etsy.com/shop/MsPamelaoriginals

Instagram: https://www.instagram.com/pk.yarn/


Business Name: What Can’t Brooke Do

The Person Behind it All: Brooke

Website: https://www.etsy.com/shop/whatcantbrookedo

Instagram: https://www.instagram.com/whatcantbrookedo/

Coupon Code: Stitchmas10 for 10%

Day 8

Business Name: Crossed in Stitches USA

The Person Behind it All: April

Website: https://www.etsy.com/shop/CrossedInStitchesUSA

Instagram: https://www.instagram.com/april.alameda/


Business Name: Patchwork & Poppies

The Person Behind it All: Jenni

Website: https://patchworkandpoppies.com/

Instagram: https://www.instagram.com/patchworkandpoppies/

Coupon Code: STITCHMAS2023 for 10% (website only, not Etsy) valid until 12/12/23

Day 7

Business Name: Wild Poppy Yarns

The Person Behind it All: Jami

Website: https://wildpoppyyarns.patternbyetsy.com/

Instagram: https://www.instagram.com/wildpoppyyarns/

Coupon Code: WILDYARN23 – 15% off


Business Name: Ginny’s Gem Minders

The Person Behind it All: Ginny

Website: https://www.etsy.com/shop/GinnysGemMinders

Instagram: https://www.instagram.com/ginnysgemminders/

Day 6

Business Name: A Sign of Interest

The Person Behind it All: Karen

Website: https://www.asignofinterest.com/

Etsy: https://www.etsy.com/shop/asignofinterest

Instagram: https://www.instagram.com/asignofinterest/

Day 5

Business Name: The Knitted Soiree

The Person Behind it All: JennaLee

Website: https://www.etsy.com/shop/theknittedsoiree

Instagram: https://www.instagram.com/theknittedsoiree

Coupon Code: Tigerlily15 for 15% off until 1/31/24


Business Name: The Stitching Gnome

The Person Behind it All: Shannon

Website: https://www.etsy.com/shop/TheStitchingGnome

Instagram: https://www.instagram.com/thestitchinggnome/

Day 4

Business Name: Stitchin With Yarn

The Person Behind it All: Cristie

Website: https://www.etsy.com/shop/StitchinWithYarn

Instagram: https://www.instagram.com/stitchinwithyarn

Coupon Code: 12 DAYS for 10% until 12/31/23


Business Name: Freedom Studios

The Person Behind it All: Penny, Bath & Christin

Website: https://shopfreedomstudios.com/

Instagram: https://www.instagram.com/freedomstudiossd

Coupon Code: FREEDOM20 for 20% off


Day 3

Business Name: As the Yoo Flies

The Person Behind it All: Christina, but her friends call her Chris :)

Website: https://www.etsy.com/shop/AsTheYooFlies

Instagram: https://www.instagram.com/astheyooflies/

Coupon Code: TIGER10 for 10% until 1/5/24


Business Name: Sweet Autumn Stitch

The Person Behind it All: Karen

Website: https://www.etsy.com/shop/sweetautumnstitch

Instagram:https://www.instagram.com/sweetstitch063/

Coupon Code: STITCHMAS23 for 10% off until 12/31/23

Day 2

Business Name: Pirate & Robin

The Person Behind it All: Robin

Website: https://www.etsy.com/shop/PirateRobinDesigns

Instagram: https://www.instagram.com/piraterobindesigns/


Business Name: Starry Owl Stitchery

The Person Behind it All: Tara

Website: https://www.etsy.com/shop/starryowlstitchery

Instagram: https://www.instagram.com/starryowlstitchery/

Coupon Code: TIGER12 for 12% off until 12/31/23


Day 1 


Business Name: The Ginger Quilter

The Person Behind it All: Natalie

Website: https://gingerquilterbox.com/

Instagram: https://www.instagram.com/ginger_quilter/

Coupon Code: STITCH for 15% off


Business Name: Siggy’s Closet

The Person Behind it All: Christina

Website: https://www.etsy.com/shop/SiggysCloset

Instagram: https://www.instagram.com/siggyscloset/

Coupon Code: STITCHMAS2023 for 15% off

My Favorite Apple Pie Recipe

This fall I’ve already made 3 of my FAVORITE homemade Apple Pies. I found this recipe years & years ago back when my kids were babies and we would go apple picking….and come home with 3 buckets of fresh Virginia apples. It has been a family favorite ever sense. ENJOY FRIENDS!

Kari’s Favorite Apple Pie Recipe


Pie:

1 pre-made Pie Crust (you can make your own, but I go easy)
1/2 cup Sugar

3T all purpose flour

2t cinnamon

7 medium/large fresh apples (I’ve used all kinds Honey Crisp, Gala, Granny Smith, Pink Lady, etc.) peeled and thinly sliced.

Crumb Topping:

1 cup packed brown sugar

1/2 cup flour

1/2 quick booking rolled oats

1/2 cup butter


1. Line a 9 inch pie plate with crust. Preheat over to 375.

2. Stir together sugar, flour, cinnamon. Add apples and gently toss until coated.

3. Transfer apple mixture to pie plate.

4. In a separate bowl, stir together crumb topping ingredients except butter.

5. Using a pastry blender, cut in the butter into the mixture until it resembles coarse crumbs.

6. Springle crumb topping over apples.

7. Bake for 50-55 minutes until the top is golden brown and bubbling.

8. Remove from oven, cool on wire rack.

9. Store in the refrigerator and tastes even better if made the day before serving.

10. Serve it warm (microwave works) with a scoop of vanilla ice cream. YUMMY!


Drop me a comment and let me know if you try it and what you thought.

Happy Baking!

XOXO,

Kari aka Tiger Lily

Topsy Turvy TableRunner Quilt a Long – Starts March 13th

Are you ready for the first ever Tiger Lily Quilt a Long?

We are starting with a super manageable table-runner made up of 5 –  12″ quilt blocks. These blocks are the perfect adventurous beginner block as I will show you my favorite HST (half square triangle) cheater block method. That means no sewing on the diagonal, and no pre-marking the backs of the fabrics with sew lines.

This will be a 4 week QAL with very easy goals per week. And the best part of starting with a table-runner project is that we can finish the entire thing on a home sewing machine. From blocks, to top quilting to binding…..in 4 weeks you will have a completely finished table-runner to enjoy.

More details will be added soon, but in the mean time here is the Materials & Supply Lists so you can start gathering and getting ready to join the fun with our March 13th start date!

Happy Sewing Friends!

Kari

aka Tiger Lily

My Bright & Cheery Christmas

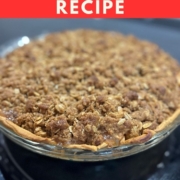
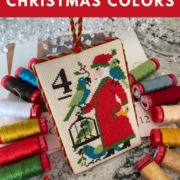
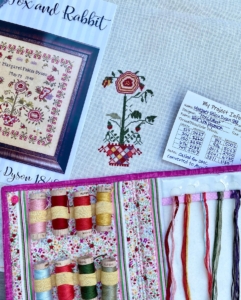
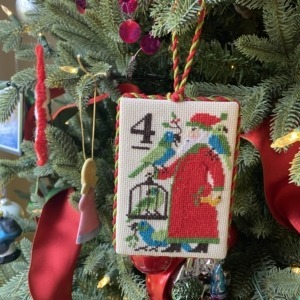
If you are a cross stitcher, you have heard of Prarie Schooler. This company has been designing classic patterns and charts for so many years. I have stitched many of them using the called for DMC colors and they of course have turned out gorgeous. I have a love of 12 Days of Christmas cross stitch ornaments. Currently I am working on 3 different series from different designers…..one day I hope to have a 12 Days of Christmas ornament tree. So when I saw the Prarie Schooler set of 3 charts at my local LNS I immediately grabbed them and kitted them up with the called for colors. Fast forward to day 1, about 70% complete….I wasn’t in love. Sadly, the colors were just a little too dark and muted for me. I LOVE colors – the BRIGHTER, the BETTER!

So after much thought, I decided that I was going to do a full Tiger Lily color conversion for this series of Prarie Schooler 12 Days of Christmas.
This was the perfect opportunity for me to pull out my fabulous Aurifil thread chart and do a fun, bright and cheery color selection. There are 17 colors used in these 12 charts, all charted in DMC.

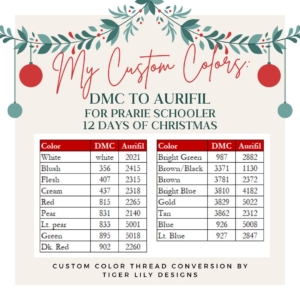
With Aurifil, I had the choice of using their traditional 6 stranded floss for stitching, this would give me the flexibility to choose any count fabric. Instead, I took this opportunity one step further and decided to get 12 wt thread spools to stitch with instead. I’ve been wanting to try to 12 wt thread and compare to the floss. The 12 wt thread was a dream. It pulls off the spool in one strand (so there aren’t any extra strands of floss to keep organized when you switch colors). It has the consistency and thickness of 2 strands of DMC, so it was perfect coverage on my chosen fabric of 16 Ct White Chocolate Zwiegart Aida.


I love so much how the ornament turned out. The colors are so bright and cheery. I used my ornament finishing technique of 2 pieces of sticky mat board, handmade cording made with my krenik cord maker tool, my glue gun and a few bits and bobs (light bulb hook with 2022 charm and jingle bells)

I’m so excited to start stitching on my next day of Christmas.
Happy Stitching Friends!
XOXO,
Tiger Lily
aka Kari

Miss Mary is finally COMPLETE!

The day is finally here, Miss Mary is complete and framed and hanging on my wall.

I wanted to share all the details about this “Big Girl” all in one place so that you could reference everything at once.

I did film YouTube video showing these changes up close and personal if you want to see:

Here are all the details:

Pattern: Mary Morgans

Designer: Fox & Rabbit  (Pattern available via pdf on their website)

Fabric: 16 ct LFA Aida Norester Gray available from Treehouse Fiber Arts (www.thknits.com)

Floss: Called for DMC, stitched 2 strands over 1


Tiger Lily Changes Made:

  1. Border was stitched symetrically. There are 2 areas in the chart where Miss Mary stitch count were off a bit, but I didn’t catch these stitches during my border stitching.
  2. I’m missing 4 birds – this was another counting error on my part with the upper teal/green motifs. I didn’t leave enough space for the second set of birds.
  3. I charted and added the letter Y and I. See graph paper charting if you want to stitch the letters.
  4. I changed the colors of the letters a bit. The white DMC floss wasn’t really showing up on my fabric, so when white was called for in the letters, I swapped the colors around so that the white was on the interior and not the exteriors.
  5. I didn’t stitch the 2 cats and 2 wolfs??? in the bottom band. Instead I took one of the motifs from the upper letter band area and stitched it below.
  6. I removed Mary’s name stitch and added another rainbow ribbon along the bottom band.
  7. I removed the biblical Welsh quote and instead charted an Oscar Wilde quote “Color can speak to the soul in a thousand different ways”

Link to PDF – Custom Quote Chart: Color Speak Stitch

I framed this myself using a 19×19 inch custom frame purchased from

https://arttoframe.go2cloud.org/SH16


Sometimes you have to Change a Floss Color

Last month I did an Aurifil custom color conversion for a cross-stitch pattern.

The pattern is Margaret Felicia Dyson from Fox & Rabbit and was originally charted with 11 silks. I thought this was the perfect opportunity to try a full Aurifil Floss stitch. I love the wooden spools, and the floss is a dream to stitch with. I created a custom keeper to hold my pretty spools as well as the loose floss. I am stitching this on 20 ct Popover Aida hand-dyed by Legacy Fiber Arts. Available only at Treehouse Fiber Arts (www.thknits.com) So that means 1 strand of floss,  the vinyl holes and the felt bed case are the perfect companion for Aurifil Floss.

I spent the month of September stitching right along….working on the funky flower in the middle. Stitching up my favorite part of the chart – the patchwork flowerpot.

The main green in the stitch is a nice Hunter green color – Aurifil #5023. The perfect stem color.


But the lighter green that I had originally converted just wasn’t right. You can see the one random leaf 
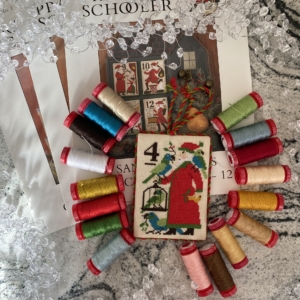
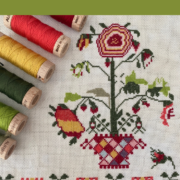
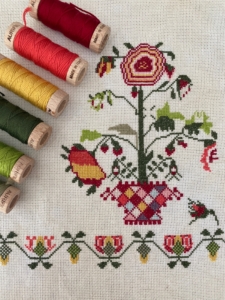
stitched in the lighter khaki color green – Aurifil #2900. Although this is a gorgeous green color, and it will be perfect to stitch a prim holiday stitch…..it was not the perfect green for this stitch.

Fast forward to mid-September, I tested two lighter & brighter Aurifil greens and now we’ve got it! Aurifil #1231 is the PERFECT bright and light green to compliment this funky floral SAL.

Now I am back in love with everything about this stitch, I just can’t put it down. I’m hopeful that the border will go fast and this gorgeous sampler will be framed and hanging in my house soon. In the meantime I’m going to kit up another Aurifil conversion for Christmas stitching, but this time I’m going to try the 12wt thread, which should be like stitching with 2 strands of floss. Time to find the perfect chart, do the conversion and of course make the stitching keeper companion.

Would love for you to join me on my next SAL. (Stitch A Long!)

Happy Stitching, XOXO,
Kari

Funky Floral SAL – My Aurifil Custom Conversion

It was time to plan a new start, and adding to my funky floral wall in my home is ALWAYS a good idea!

When I saw Miss Margaret Felicia Dyson released at market last spring from Fox and Rabbit designs, I couldn’t add her to my pre-order list fast enough. She patiently waited her turn until this month when I decided it was time to kit her up. A Tiger Lily kit up usually doesn’t follow the called for much……sometimes yes, but usually no. And this pattern was no exception. With only 11 colors of floss called for I though this was the perfect chart to try my first Aurifil Floss custom color conversion. I broke out my Aurifil color charts, my DMC color charts and then the pattern cover sheet……a couple hours later, and a few Floss toss with color chips, the custom color conversion was FINAL!


Here’s a picture of the floss toss on my gorgeous 20 ct LFA Linens Popover Aida, (available at www.thknits.com) and my Project Information card detailing the custom floss conversion from DMC to Aurifil Floss. Aurifil Floss can be purchased by the spool at various online retailers.

With these gorgeous wooden spools versus bobbins or floss drops, my creative mind started to imagine all different ways to organize the project. I love a good kit up, but I also love a beautifully organized project keeper. So this prompted a proto-type design couple days in the studio to create and design m  new spool keeper. It keeps all those gorgeous wooden spools of Aurifil floss all nice an tidy, and the “floss drop inspired” thread bed side of the keeper is working out wonderfully. Pulling just one thread out of the top works fantastic.⁠

I will be working on writing this spool keeper pattern in case you want to sew one up for your next Aurifil project. And of course it will come with an exclusive instructional video to give you step by step sewing guides so even a beginner can make this functional, yet gorgeous piece of organization.

Does Miss Felicia speak to you? Would love for you to join me in my #funkyfloralSAL on Instagram. I shared all the close up details on my most recent Flosstube video on Youtube. Here is the link – https://youtu.be/e2jq_4lGqqc

Happy Stitching & Sewing Friends!

XOXO,

Kari aka Tiger Lily


Patchwork Notebook Cover with a Fun Twist

So I’m a list maker. To Do List, Grocery List, Chore List, Work List, Wish List, Book List, Fabric List, Stitch List, Bucket List……the List goes on! :)

I’ve tried tons of different ways to organize my lists, and have found that keeping a small notebook of “All the Things” works best for me. It’s small enough so I can grab & go in my tote bag, but also keeps everything in one place. I tried the whole iphone list thing for awhile, but I’ve come to the conclusion I’m a pen & paper gal. The action of crossing off a list is so satisfying.

A cute 6×9 lined notebook is my go to size. It’s pretty common and easy to find. But of course, I have to add a Tiger Lily twist to it with a custom cover. Not only does it protect the notebook so it can last until  all the pages are filled out, it also looks pretty. And anyone who knows me will know that function & style are BOTH important in my book.

While I’m not sure I have passed along the list making gene to my daughter Lily, I thought it would be fun to make her a custom notebook cover to add to her ever growing school supply box for University of Virginia next fall. The idea originated from a gorgeous variegated thread from Aurifil. Color #3852 features a soft variegation from Orange to Blue to White. I’m not sure what this Italy thread company originally designed this thread for , but it was PERFECT for UVA! Scrappy patchwork using orange and blue 2.5″ squares featuring a quilted top stitch using this gorgeous Aurifil thread , blended with custom UVA interior fabric…my Lily notebook cover design was ready to assemble.


I created the custom patchwork cover using my super fabulous perfect point patchwork method lining the squares up on lightweight fusible interfacing, ironing them one and then sewing the seams. Perfect points EVERY TIME! Here is a link to my YouTube video tutorial going into detail on this patchwork method.

Once I had the patchwork squares all stitched together, it was time to utilize the perfectly coordinating Aurifil thread. I used a longer 3 stitch length and top quilt stitched up & down, and left & right over the the whole cover. The effect was so fun with the variegated thread. Lily actually had to look closely, she first thought I had switched my threads and colors every time…that’s the magic of a funky variegation thread.

The next step to a sturdy notebook cover is attaching it to heavyweight Pellon  72F – 2 sided fusible. Inside cover flaps are made with Pellon 809, this is where I utilized the fun UVA quilting cotton. The 3 pieces were sewn together and then flipped inside out. I added an elastic cover band made with more patchwork & button – adds a little funky and it keeps the cover closed.

And just like that the cover was done. I gifted it to Lily this past week and she’s already got her first list going…..What to pack for her freshman dorm.

T-minus 60 days and I’m moving her into UVA. WHAT? Happy Sewing Friends! XOXO, Kari


2 years dye free – best decision EVER!

Let me set the stage here……nope this was not a “COVID made me do it” situation.

Luckily for me I pulled the dye free band-aid off 9 months prior to the first lockdown, so I was already in that awkward grow out stage and appreciating the silver lining of my all day. everyday “stay at home” messy bun.

I started dyeing my hair in high school, that’s when it was for fun. Add some red, add some highlights, all the things. I had a crazy time my junior year in college, when it was supposed to be a dark brown, but it came out Elvira black. So then came the color correction, which gave me the end result of almost orphan Annie orange…..college was fun! :)

Fast forward to my twenties, I’m married, working, trying to be a grown-up. And I’ve got silver hairs  popping up in my crown. So I returned to my trusty box dye to go back to my natural share of brown. Easy peezy! I could get by with a home box dye every 2-3 months. Remember, I’m a broke, just graduated, just married…..nobody has the $$ for salon hair color.

This became my life. But as the years went by, more and more gray roots started popping in. So my 2 months became 6 weeks, and then 4 weeks and come around 35 years old…..I had a full on gray skunk stripe just 2 weeks after my dye. So I would rock a pulled back bun for a week or two trying to hold out to the 4 week re-dye.

2017 (I’m 41 years old) was my year from “hell”. No need for the details……but there was lot of time for life reflection.

2018 – still dyeing my hair at home religiously at the 3-4 weeks mark. I’ve mastered the root dye only, looks great for a couple weeks. But OMG, my long hair is super crunchy. Years and years of box dye can’t be undone. No matter how many hair mask treatments you try.

2019 – I’ve got a Pinterest board FULL of silver hair transition inspiration. I’m thinking about doing it…..but really I’m only 43? Do I really want to be the mom with gray hair?

6/23/19 – My last box dye at home. I didn’t know at the time it was my last dye. I was going on vacation the next week

 I wanted fresh, no gray roots hair. After I came home from vacation, and the skunk grow out came yet again as it had hundred time before – this time I said NOPE! I’m DONE!  And so began the clock on growing out my silver.

Yup, I call it SILVER!

In Sept 2019, I did go to my salon (this was not a job for at home) and had some transition highlights put in. The super harsh line between old color & silver roots was intense. She didn’t touch my “virgin hair”, it was all about blending down the new silver into the old color. This looked good for awhile, but honestly for it to work correctly a gray toner needed to be put on those highlights every 2-3 months she said…..and I wasn’t down with that. So I took my softened grow out line and set-out to just grow it out!

Don’t get me wrong – there were MANY days this wasn’t easy. I had days I wanted to dye. I had days I wanted to bob cut, even pixie cut….but I had learned years ago those styles aren’t flattering to my round face.

Here’s a little timeline during the grow out. October 2019, Jan 2020, June 2020, Sept 2020.


Every month the SILVER got longer and longer.

It’s fascinating to see my natural color again after 25 years behind box dye.

This is my most recent gray hair transition photo. Taken just last week, June 2021, the morning before my son’s high school graduation party! Yup! I’m the SILVER mom! And a Clemson MOM to boot. GO TIGERS!

And I LOVE it!

The natural color is wild. Highlights and tones you could NEVER get at a salon. My crown is 27 shades of silver & pepper. And the bottom 1/2 of my hair is still my natural dark brown. It’s just crazy!

Funny story -I’m at a birthday BBQ a few weeks back…..tons of people I don’t know. Lots of 20 somethings there. Two different occasions, a 20 something came up and told me they love my dye job & color. HA! If you are a slave to the box dye and looking for a silver friend. I’m happy to be her!

Happy SILVER friends! Embrace the freedom.

XOXO,

Kari aka Tiger Lily


meet my 1950’s pink atlas sewing machine

Sewing machines come in all shapes & sizes. Currently, my Tiger Lily sewing studio has 6 different sewing machines.

I know. I know. I can hear you now!

Holy Moly! You can only sew on one at a time, why so many?

Let me explain. :)

Well to a sewing & quilting junky…..fabric is our 1st “crack” addition. (Can we ever have too much? No, I don’t think so either!)

And for me, sewing machines are becoming a close 2nd place runner up.


The most recent addition to the Tiger Lily machine family is this beautiful Pink Atlas.

Picture it. Beautiful day, February 2020 (Pre-COVID crazy) at the local Goodwill is Leesburg, VA.

I’m doing my normal scouting for fabulous sweaters that need to live their next best life as a one of a kind Tiger Lily Gnome. After sweater hunting, I venture back into the furniture, household goods area…..because to be honest, I might have a little problem collecting project furniture that I will bring back to life with a few coats of Annie Sloan paint. Do I need another end table? No, I do not!  But, you just never know what gems you are going to find…..but I digress.

On the floor, back in the back….was this tattered old sewing machine box. After spending what seemed like 10 minutes to figure out the crazy vintage metal clasp thingy to open it…..I got her open. OH MY GOSH! It’s a PINK sewing machine. It was the cutest thing I had ever seen. Stickered at $24.99. I knew I had to have her in my life! My first thought was, I have a artist friend who made a lamp out of old sewing machine parts…how adorable would a pink sewing machine lamp look in my studio. YES!

She weighed an ever loving ton, but I got her paid for and loaded up into my car.

I was like a kid on Christmas morning when I got home.  I opened the box up and found out not only was she a gorgeous piece of sewing history, she came with her original box of attachments, instruction manual….AND when I plugged her in she started up. Oh my goodness, she’s not going to be a lamp….I can sew with this beauty.

Then became my obsession to find out all the things about the beauty. Google to the rescue!

The original Atlas sewing machine company lasted for about 40 years, from 1874 to 1914, yet there is very little information on the company. Then in the 1950s and 60s, there was another Atlas sewing machine produced by Brother. Those machines were famous for their bright colors. Manufactured in Japan, sold in the states by Brother. Made of all metal parts (not a piece of plastic on this beauty), she weighs over 30lbs.

She sold for $219.50 in the 1950s. Quite a pretty penny for 70 years ago.

Although, she did turn on and the needle would go up and down with the pedal….she was in dire need of some TLC before I could truly see what she was capable of.  Thankfully I’ve got a guy. A wonderful local sewing machine repair man who keeps all my machine running in tip top shape! He was excited for the the challenge to bring this beauty back to life.

2 weeks later he returned her to me and said “This is a workhorse! Industrial machine fast and super straight.”

OMG! She sews like a dream.

Doesn’t have the bells and whistles of the new modern machines with their automatic foot, knee bars, thread cutters..and so much more…..BUT she also doesn’t have a computer that thinks it knows better. I can set all the knobs & dials, and sew straight for hours and hours, not missing a beat.

When I first bought this beauty, I thought she was just going to be a pretty decoration…..nope, she works just as hard as my fancy machines AND she looks gorgeous doing it!  That’s 100% my type of girl!

What machine do I need next? What is your favorite?

Drop me a comment if you are here. (Or if you are shy, that’s ok too. Maybe after a few posts you can wave Hi 😊)

Until next time.


XOXO,

Kari aka Tiger Lily


For Fun – Here’s a full list of the Tiger Lily Studio Machines:

Husqvarna Lena

Husqvarna Sapphire

Husqvarna Serger

Babylock Coronet Long Arm

Bernina 790 Plus

Vintage Pink Atlas